
Learning to play a new instrument can be an overwhelming experience. You’re clueless on how to start, your fingers get sore quickly, and the diagrams seem unreadable. Even when you attempt to watch tutorials, you find different musicians playing in different ways, which doesn’t help.
While this could also apply to learning to play the ukulele, the ukulele is among the most beginner-friendly instruments you could come across.
To give you a push, we’ve prepared this guide to put you on the right track and teach you how to play the basic ukulele chords in the most simple way possible. Keep reading!
Show contents
Preparation
1. Tuning
Before starting to play right away, you need to make sure that your ukulele is tuned. The standard ukulele tuning is G-C-E-A. The closest to your chin is the G, string, and the farthest is the A string.
Tuning profoundly affects the sound your ukulele produces, and it can ruin your entire playing experience, sending a wrong message that the instrument is not for you.
Therefore, the most essential step is to get yourself familiar with the tuning process. You could use a digital tuner, an online tuner, or a ukulele tuning application. By time, you will pick up on when the ukulele is tuned just by listening to it.
2. Chord Chart Reading
To simplify the process, you need to be aware of the basics of chord charts. Charts show four vertical lines, each representing a ukulele string. The first represents the top string on the ukulele (the G).
As for the horizontal lines, they represent the frets. The top line is usually either thicker or marked by a double line, representing the guitar’s nut.
If the chart shows frets higher than the fourth one, then you won’t find the top line being bold or marked. You will, instead, see numbers on the left or right sides, referring to a particular fret number when a chord is played higher than the fourth fret.
You will also come across black circles or dots on the chart. Dots mean that this string should be fretted or pressed down to the fretboard with your finger. Other chords show an “o” at the top of strings, meaning they are not to be fretted and are played open.
A few chord charts also specify which finger to use for fretting by placing numbers within the dots; we explain this in the next section. Other charts show finger placements at the bottom, or between chord names and nut marks.
If you see an “x” on the top of a string, this means it should be muted or not played. You do this by touching one or more fingers of your fretting hand without pushing it down or fretting it.
Lastly, chord charts convey if the chord is a minor one or a major one through letters. Minor chords have a lowercase m, for example. A chord written as “Cm” is a C minor chord.
Getting Started
Step 1: Place Your Fingers in Perfect Position
You may horse-about trying to find different or unique ways to fathom your fingers, but there is just one reliable way to do it for beginners, which will be described shortly. Having your ukulele produce the best sounds is the ultimate end-goal, so don’t distract yourself by searching for strumming positions.
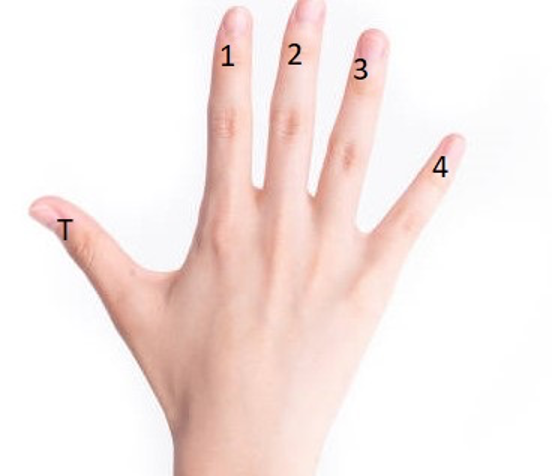
There are four strings on each ukulele, so an excellent technique to help you out is to number your fingers: thumb as (T), index as (1), middle finger as (2), ring finger as (3) and pinky as (4).
Support the ukulele neck with the upper side of the palm of your hand, while also resting in your thumb over the top of the neck. Following that, support the back of your ukulele with the inside of your forearm.
Lastly, claw your fingers onto the ukulele frets of your desired chord; this will help you to produce better sounds because your fingers are not muting the sound being produced out of the strings.
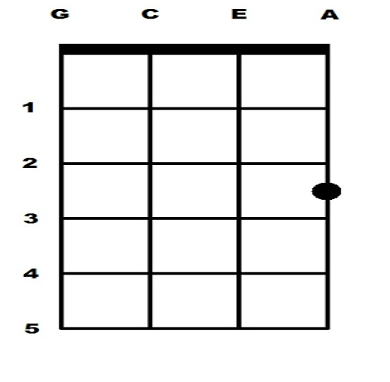
Step 2: Experiment With The C Major Chord
Now that you’re comfortable, let’s test your hand out with the C Major (CM) chord. To do this, place your ring finger on the third fret of your A chord, to deliver a CM sound.
Strum repeatedly, and pay close attention to whether any of your tunes are being muted due to unintended mispositioning.
Practice makes perfect, so keep practicing until you master the position and this ukulele chord!
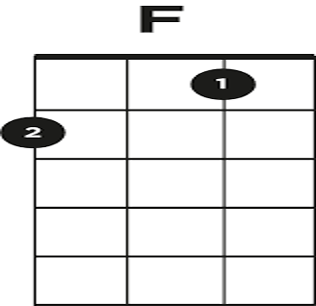
Step 3: Second Chord Trial
Let’s try another chord, shall we? We’ll go with the F major chord. If you ever played the guitar, you will expect this to be difficult. However, on the contrary, you only need two fingers for it!
Place (1) on the first fret of E and (2) on the second fret of G. That’s it!
Tip: Make sure the rest of your fingers are distanced from the ukulele to guarantee the best quality of sound possible. Also, start strumming with your first finger.
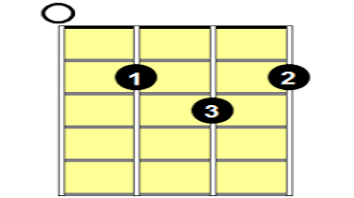
Step 4: Conclude With GM
We’re almost there, hang on! To master your G Major chord, you just need to place your first finger on the second fret of C, your second finger on the second fret of A, and your third finger on the third fret of E, forming a mini-triangle.
Your G is the free chord marked by the white strong. Again, if you were a guitarist, this resembles the D major chord on the guitar, but on a four-string ukulele.
Step 5: Play Your First Song
We’re there! Here’s a guide to follow to play your first song using the chords you have just learned above. Let’s put the learning into practice!
Also, here are some hand-picked songs for you to play along with, performed by professionals of the ukulele with guidance. Remember to learn and practice all the above chords first before playing any of the below songs:
Types of Chords
Major Chords:
These chords are basically the joyful part of your ukulele. If you learn and use them to play free music, you will end up creating some fun uptempo melodies. A, B, C, D, E, F, and G are what you can refer to as equals to La, Si, Do, Re, Mi, Fa, Sol.
Now, most of these chords are very easy to learn, but it will take you quite some time if you want to learn the B and E, which are rarely used nowadays in contemporary music.
See a picture of the correct positions below:

Minor Chords:
These chords are what are referred to as either “dark” or “intimate” music chords. They generate emotional feelings that are not as joyful as the major chords generate. They are usually marked by the lowercase “m.” The most important ones to learn are Am, Dm, And Em.

Barre Chords:
These are chords that are fretted using one finger at the same time, and they’re noted on charts by a solid or curved line extending through a fret from the first note of a chord to its last one.
Alternatively, it can be demonstrated by a series of black dots in the same fret that share the same finger number.
Seventh Chords:
Seventh chords add a “funky” and groovy vibe and feeling to songs that are commonly used in blues, jazz, and uptown songs. They are indicated by the number 7 after the letter name,
Learning seventh chords can assist you in improvising on songs and make the audience curious! Try the F7, and you won’t regret it.
General Advice
Strumming Is a Process
The way you strum really depends on your experience with playing the ukulele. Through your learning process, you will try out different strumming patterns, and you will familiarize your strumming fingers with them. After that, your strumming hand will be dominated by one strumming pattern/style.
Therefore, you shouldn’t worry much about the different strumming styles you see. It is preferable not to force your hands to a particular strumming position. Leave your hands to decide on the style they feel like following for the best possible sound quality.
Start on the Right Foot
The learning process will be a much-smoother one if you start off on a high-quality ukulele. This doesn’t mean you have to break the bank; it just means you have to conduct proper research to find the suitable ukulele for you, even if you’re on a budget.
Quality ukuleles will allow you to train your ear on the tuning faster, and it won’t require much tuning from your end, which will motivate you to keep learning.
Conduct Finger Exercises
If you’re new to playing an instrument, you are most likely to face the issue of your fingers getting sore or feeling uncomfortable.
For that reason, develop a habit of including finger exercises into your daily routine to increase the reach of your fingers, and also to help you play for a longer time and more rapidly.
Continuous Learning
Learning is never a destination; it’s a journey. Gather your information from multiple sources and train yourself with different methods. Don’t stop at the basics. Watch videos, read guides, practice with varying genres of music, compose your own songs, jam with your friends; these are all pre-requisites to you becoming a professional ukulele player.
Final Words
Comfortably positioning your hands can make or break your playing experience. You should support the ukulele but also feel at ease playing it; you shouldn’t be feeling tense.
Many beginners make the mistake of just positioning the fingers on the chords without feeling at ease playing it, and that can be very discouraging, so make sure not to fall in that trap.
Otherwise, the ukulele is a perfect instrument to step into the world of music, and you won’t take a long time before you master the tunes and start playing your favorite songs.